General

How does this tomato sauce french compare to traditional garlic sauces?

Our tomato sauce French offers a unique twist on traditional garlic sauces, bringing together the rich flavors of ripe tomatoes, savory garlic, and aromatic herbs and spices.

Here’s how it compares to traditional garlic sauces:

  1. Base Ingredient: While traditional garlic sauces often feature a garlic-forward flavor profile, our tomato sauce French places a greater emphasis on ripe tomatoes as the base ingredient. The combination of tomatoes and garlic creates a harmonious balance of sweetness and savory notes, resulting in a more complex and nuanced flavor profile.
  2. Texture: Our tomato sauce French typically has a smoother and thicker texture compared to traditional garlic sauces, thanks to the natural thickness of pureed tomatoes. This texture adds richness and body to the sauce, making it ideal for coating pasta, pizza, and other dishes.
  3. Versatility: While traditional garlic sauces are commonly used as a pasta sauce or dipping sauce, our tomato sauce French offers greater versatility in culinary applications.  tomato sauce french  It can be used as a base for various dishes, including pasta, pizza, soups, stews, casseroles, and more, adding depth and flavor to a wide range of recipes.
  4. Flavor Profile: Our tomato sauce French boasts a well-rounded flavor profile that balances the sweetness of tomatoes with the pungency of garlic and the aromatic notes of herbs and spices. This combination of flavors creates a sauce that is both vibrant and satisfying, with layers of complexity that elevate any dish it accompanies.
  5. Health Benefits: In addition to its delicious taste, our tomato sauce French offers health benefits associated with tomatoes, such as being a good source of vitamins, minerals, and antioxidants. By incorporating tomatoes into the sauce, we enhance its nutritional profile while maintaining its exceptional flavor.

Overall, while our tomato sauce French shares some similarities with traditional garlic sauces, it stands out for its unique blend of ingredients, versatile applications, and robust flavor profile. Whether used as a pasta sauce, pizza topping, or cooking base, it adds a delicious touch of French-inspired flair to any meal.

How does a 90 degree structural pipe connector facilitate multi-directional fluid flow?

A 90-degree structural pipe connector is designed to facilitate multi-directional fluid flow by providing a joint that allows pipes to change direction while maintaining structural integrity. Here’s how a 90-degree structural pipe connector achieves this:

  1. Angular Configuration:
    • The 90-degree design of the connector allows pipes to change direction at a right angle. This angular configuration is versatile, enabling fluid flow to be redirected horizontally, vertically, or in any other direction perpendicular to the original pipe orientation.
  2. Tight Connection:
    • The connector ensures a tight and secure connection between the pipes. This tightness is essential for maintaining the structural integrity of the joint and preventing leaks or potential points of failure.
  3. Socket or Welded Connections:
    • Depending on the type of connector, it may feature socket connections or welded joints. Socket connections allow for easy assembly and disassembly, while welded joints provide a permanent and robust connection.
  4. Smooth Inner Surface:
    • The inner surface of the connector is designed to be smooth to minimize friction and pressure drop as fluid flows through the joint. This design consideration is crucial for maintaining efficient fluid flow.
  5. Material Strength:
    • The connector is constructed from materials with sufficient strength to withstand the fluid pressure and structural loads. Common materials include steel or other alloys that offer the required strength and durability.
  6. Versatility in Fluid Flow Direction:
    • A 90-degree structural pipe connector is versatile, allowing fluid to flow in multiple directions. This adaptability is beneficial in complex piping systems where changes in direction are required to navigate around obstacles or optimize the layout.
  7. Adherence to Standards:
    • The design of the connector typically adheres to industry standards and specifications. This ensures compatibility with pipes of standard sizes and guarantees a consistent approach to fluid flow in various applications.
  8. Corrosion Resistance:
    • Connectors are often coated or made from materials that resist corrosion. This is especially important in applications where the fluid may contain corrosive elements, ensuring the longevity and reliability of the connector.
  9. Ease of Installation:
    • The design of the connector takes into account ease of installation. This can include features such as pre-drilled holes for fastening bolts or a socket design that simplifies the assembly process.
  10. Compatibility with Pipe Sizes:
    • Connectors are manufactured in various sizes to accommodate different pipe diameters. This compatibility ensures that the connector can be used in a wide range of piping systems.
  11. Threaded Connections (Optional):
    • Some connectors may have threaded connections, allowing for easy assembly and disassembly. Threaded connections also provide additional flexibility for making adjustments or modifications to the system.
  12. Support for Various Fluids:
    • The connector is designed to support the flow of various fluids, including liquids and gases, making it suitable for a diverse range of applications.

In summary, a 90-degree structural pipe connector achieves multi-directional fluid flow by providing a reliable, secure, and adaptable joint that allows pipes to change direction while maintaining structural stability and efficient fluid flow.


How does this 90 degree structural pipe connector maintain structural integrity while connecting four pipes?

A 90-degree structural pipe connector that connects four pipes is typically designed with features that ensure structural integrity and stability. The specific design may vary depending on the connector type, but common elements contributing to structural integrity include:

  1. Material Strength:
    • The connector is typically made from materials with high strength and durability, such as steel or other alloys. This ensures that the connector can withstand the structural loads and pressures imposed by the pipes and the fluid within them.
  2. Robust Construction:
    • The connector is constructed with a robust design that can handle the forces acting on it. This includes consideration of factors like bending moments, axial loads, and torsional forces that may be applied when connecting multiple pipes.
  3. Welded Joints:
    • Welded joints between the connector and the pipes contribute to structural integrity. 90 degree structural pipe connector  Welding creates a strong and permanent connection, enhancing the overall stability of the joint.
  4. Thick Wall Sections:
    • The connector may have thick wall sections, especially at critical points where stress concentrations are likely. This design feature helps distribute loads and reinforces the connector against potential points of failure.
  5. Reinforcement Plates:
    • Additional reinforcement plates or gussets may be added to key areas of the connector to enhance its structural strength. These plates help distribute forces and reduce the risk of deformation or failure.
  6. Bolted Connections:
    • In some cases, bolted connections may be used to secure the pipes to the connector. Bolts and nuts provide a reliable means of fastening and allow for disassembly if needed.
  7. Precision Machining:
    • The connector undergoes precision machining to ensure accurate dimensions and proper alignment of the pipes. Precise machining helps maintain the structural integrity of the joint and ensures a secure fit.
  8. Adherence to Standards:
    • The design and manufacturing of the connector adhere to industry standards and specifications. Compliance with standards ensures that the connector meets established criteria for structural performance and reliability.
  9. Load Distribution:
    • The design of the connector focuses on distributing loads evenly among the connected pipes. This prevents excessive stress on individual pipes and contributes to the overall stability of the joint.
  10. Finite Element Analysis (FEA):
    • Advanced engineering techniques, such as finite element analysis, may be employed in the design process. FEA helps simulate and analyze the structural behavior of the connector under various loads, allowing for optimization and refinement.
  11. Corrosion Protection:
    • The connector is often coated or treated with corrosion-resistant materials to protect it from environmental factors that could compromise its structural integrity over time.
  12. Alignment Features:
    • Alignment features ensure that the pipes are properly aligned and connected to the connector. Proper alignment is essential for preventing stress concentrations and maintaining overall structural stability.

By incorporating these design principles and features, a 90-degree structural pipe connector can effectively maintain structural integrity while connecting four pipes. The connector is engineered to withstand the mechanical loads and stresses associated with the interconnected pipes and ensure a secure and stable joint in various applications.

How does the 5 way black pipe fitting distribute fluid across its four outlets?

A 5-way black pipe fitting typically distributes fluid across its four outlets in a manner that allows for even flow and pressure distribution. The design of the fitting plays a crucial role in achieving this. Here’s how the distribution is typically facilitated:

  1. Symmetrical Design:
    • The fitting is designed to be symmetrical, with each outlet arranged in a balanced configuration. This symmetry helps ensure that fluid is distributed evenly across the four outlets.
  2. Equal Diameter Outlets:
    • The outlets of the fitting are usually of equal diameter, promoting uniform flow rates through each outlet. This prevents one outlet from experiencing significantly higher or lower flow than the others.
  3. Smooth Flow Pathways:
    • The internal structure of the fitting is engineered to provide smooth flow pathways for the fluid. This minimizes turbulence and pressure drop, contributing to even distribution.
  4. Reduced Turbulence:
    • Turbulence in fluid flow can lead to uneven distribution. The fitting design aims to minimize turbulence through careful shaping and channel configurations, ensuring a more stable and balanced flow.
  5. Gradual Angles and Curves:
    • The angles and curves within the fitting are designed to be gradual, avoiding abrupt changes in direction that could disrupt the flow. This design choice helps maintain a steady and even distribution of fluid.
  6. Cross-Sectional Area Considerations:
    • The cross-sectional area of the fitting is designed to accommodate the desired flow rates. Proper sizing prevents excessive velocity and friction that could lead to uneven distribution.
  7. Pressure Equalization:
    • The fitting may include features that equalize pressure drops across the different outlets. This ensures that each outlet experiences a similar pressure drop, contributing to balanced flow.
  8. Flow Control Devices (Optional):
    • Depending on the application, the fitting may incorporate flow control devices such as valves or dampers. These devices allow for adjustment and regulation of flow rates, contributing to a more controlled and even distribution of fluid.
  9. Tapered Ends (Optional):
    • In some designs, tapered ends on the outlets can facilitate smoother transitions from the fitting to the connected pipes, reducing the likelihood of uneven flow.
  10. Material Selection:
    • The choice of materials for the fitting can impact the friction characteristics of the internal surfaces. Materials with smooth surfaces and low friction coefficients contribute to more uniform flow.
  11. Proper Installation:
    • Correct installation practices, including aligning the fitting properly with the connected pipes, help ensure that fluid is distributed evenly without obstructions or disruptions.

It’s important to note that the specific design details can vary among different manufacturers and types of 5-way black pipe fittings. Therefore, consulting the manufacturer’s specifications and guidelines for a particular fitting is crucial to understanding how it achieves fluid distribution across its outlets in a given application.

How is the 5 way black pipe fitting’s sealing integrity ensured across multiple connections?

The sealing integrity of a 5-way black pipe fitting across multiple connections is crucial to prevent leaks and ensure the reliable operation of the piping system. The design and construction of the fitting, along with proper installation practices, contribute to achieving and maintaining sealing integrity. Here are key aspects that ensure the sealing integrity:

  1. Gaskets or O-Rings:
    • Many pipe fittings, including 5-way black pipe fittings, utilize gaskets or O-rings made of rubber or other elastomeric materials. These components are placed in between the mating surfaces of the fitting and the connected pipes to create a reliable seal.
  2. Material Compatibility:
    • The choice of materials for the gaskets or O-rings is crucial for compatibility with the fluid being transported and the environmental conditions. The materials must resist degradation, swelling, or deterioration when exposed to the specific fluid and operating conditions.
  3. Proper Compression:
    • Proper compression of the gaskets or O-rings is essential to create a tight seal. 5 way black pipe fitting  Over-compression or insufficient compression can both lead to sealing issues. The fitting should be tightened according to the manufacturer’s specifications to ensure optimal compression.
  4. Precision Machining:
    • The machining and manufacturing processes used to create the fitting’s surfaces must be precise to ensure a proper mating surface for the gaskets or O-rings. Irregularities or imperfections in the surfaces can compromise the sealing integrity.
  5. Threaded Connections:
    • If the 5-way black pipe fitting uses threaded connections, the threads must be well-formed and properly engaged. The threaded connections should be tightened securely to achieve a leak-free seal.
  6. Thread Sealant (Optional):
    • In threaded connections, applying a suitable thread sealant can enhance the sealing integrity. Thread sealants help fill gaps between threads, preventing leaks in threaded connections.
  7. Flared or Compression Fittings (Optional):
    • Some fittings use flared or compression connections. In such cases, the sealing integrity is achieved through the compression of a ferrule against the pipe surface, creating a secure and leak-resistant joint.
  8. Tightening Sequence:
    • Following the recommended tightening sequence specified by the manufacturer is crucial. Tightening bolts or nuts in a specific order helps distribute the load evenly, ensuring uniform compression of gaskets or O-rings.
  9. Inspection and Testing:
    • Before putting the system into operation, a visual inspection of the fitting and surrounding connections is important. Additionally, pressure testing the system can reveal any potential leaks, allowing for corrections before actual operation.
  10. Torque Specifications:
    • Adhering to the manufacturer’s torque specifications during installation is vital. Proper torque ensures that the fitting is tightened sufficiently without causing damage to components or compromising the seal.
  11. Proper Alignment:
    • Ensuring that the fitting and connected pipes are properly aligned during installation helps prevent stress on the gaskets or O-rings, maintaining their integrity over time.
  12. Regular Maintenance:
    • Periodic inspections and maintenance activities can identify potential issues with the sealing integrity, allowing for timely replacements or adjustments as needed.

By addressing these factors, a 5-way black pipe fitting can achieve and maintain sealing integrity across multiple connections, ensuring a leak-free and reliable performance in the piping system.

Unleash the Magic of Color-Changing Cute Lip Balms for Beauty Lip Care

Beauty enthusiasts are always on the lookout for innovative and fun products that not only provide effective lip care but also add a touch of whimsy to their beauty routines. Enter color-changing cute lip balms, the magical lip care products that captivate with their ability to transform hues upon application. These adorable balms not only nourish and protect your lips but also bring a playful element to your beauty arsenal. Let’s explore the magic and charm of color-changing cute lip balms and how they can revolutionize your lip care routine.

The Magic of Color Change:

Color-changing cute lip balms are formulated with special ingredients that react to the pH level of your lips, creating a unique shade that enhances your natural lip color. As you apply the balm, it adjusts to your lips’ pH, beauty lips care magic change color cute lip balm resulting in a personalized hue that complements your skin tone. Witnessing the transformation unfold is like experiencing a mini-makeup miracle, adding a touch of excitement to your daily beauty rituals.

Benefits of Color-Changing Cute Lip Balms:

  1. Customized Lip Color: The magic of color change ensures that no two shades are exactly alike. The balm interacts with your lips’ pH, creating a personalized color that suits your complexion, making it a truly unique lip product.
  2. Nourishment and Hydration: Color-changing cute lip balms not only add a pop of color but also provide essential moisture and hydration to your lips. They are often enriched with nourishing ingredients like shea butter, vitamin E, and natural oils, helping to keep your lips soft, supple, and kissable.
  3. Versatility and Adaptability: These lip balms are versatile and suitable for various occasions. The color-changing feature allows you to adapt your lip color to different settings, from a subtle tint for everyday wear to a more vibrant shade for special events.
  4. Fun and Playfulness: The enchanting color transformation adds a sense of whimsy and playfulness to your beauty routine. Applying a color-changing cute lip balm becomes a delightful experience as you watch it morph into a shade that’s uniquely yours.
  5. Ideal for All Skin Tones: Color-changing lip balms adapt to your individual lip chemistry, making them suitable for a wide range of skin tones. No matter your complexion, you can enjoy the magic and beauty of these balms.

Color-changing cute lip balms offer a delightful fusion of beauty and playfulness, revolutionizing the way we approach lip care. With their ability to transform hues and provide nourishment, they add a touch of magic to our everyday routines. Whether you’re looking to enhance your natural lip color, add a fun twist to your makeup collection, or simply enjoy nourished and moisturized lips, these balms are a must-have. Embrace the enchantment of color-changing cute lip balms and let your lips radiate with personalized beauty and charm.

beauty lips care magic change color cute lip balm

What do you need to pay attention to custom jeans buttons ?

When it comes to custom jeans buttons

Here are several factors to consider and pay attention to:

  1. Design and Style: Decide on the design and style of the custom jeans buttons. They come in various shapes, sizes, and finishes. Consider the overall aesthetic of your jeans and choose a button design that complements the style you want to achieve.
  2. Material and Durability: Custom jeans buttons are typically made from materials like metal, brass, stainless steel, or zinc alloy. Pay attention to the material’s durability and strength to ensure that the buttons can withstand regular use and washing without easily breaking or tarnishing.
  3. Attachment Method: Consider the attachment method of the jeans buttons. Common options include sew-on buttons or buttons with a rivet-style attachment. Choose the attachment method that best suits your preference and the type of jeans fabric you’re working with.
  4. Size and Fit: Determine the appropriate size of the custom buttons based on your jeans design and the buttonholes. Ensure that the buttons are neither too small nor too large for the buttonholes, as this can affect the functionality and appearance of the jeans.
  5. Branding and Customization: If desired, explore options for branding or customization on the buttons. This can include engraved logos, symbols, or text. Discuss customization possibilities with the manufacturer or supplier to ensure they can accommodate your specific needs.
  6. Quality and Testing: Ensure that the custom jeans buttons you order meet quality standards. Request samples or inquire about the manufacturer’s quality control processes. The buttons should be resistant to corrosion, have secure attachment mechanisms, and undergo testing to ensure they hold up well under normal usage conditions.
  7. Cost and Quantity: Consider the cost and quantity requirements for your custom jeans buttons. Custom manufacturing may have minimum order quantities, so determine the quantity you need and confirm the pricing with the supplier.
  8. Lead Time and Shipping: Inquire about the lead time for production and shipping of the custom buttons. Custom manufacturing may take time, so plan accordingly and ensure the supplier can meet your timeline requirements.
  9. Supplier Reputation and Reviews: Research the reputation and reviews of the supplier you are considering. Look for feedback from past customers to assess the quality of their custom buttons and their overall reliability as a supplier.

By paying attention to these factors, you can ensure that your custom jeans buttons meet your desired design, quality, custom jeans buttons and functional requirements. Effective communication with the supplier and understanding the production process will help you achieve the desired result.

Here are some additional points to consider when it comes to custom jeans buttons:

  1. Color and Finish Options: Custom jeans buttons often come in a variety of colors and finishes. Consider options such as classic metal finishes (like silver, gold, or bronze), antique finishes, or even colored enamel coatings. Select a color and finish that complements the overall look and style of your jeans.
  2. Custom Logo or Design: If you want to add a personalized touch to your jeans buttons, inquire about the possibility of including a custom logo, design, or text. Many manufacturers offer customization services where you can have your brand logo or a unique design engraved or embossed on the buttons.
  3. Button Thickness and Profile: Pay attention to the thickness and profile of the buttons. Thicker buttons may provide a more robust and durable feel, while thinner buttons can offer a sleeker and more subtle appearance. Consider the overall design and functionality of your jeans when choosing the appropriate thickness and profile.
  4. Eco-friendly Options: If sustainability is a priority for you, inquire about eco-friendly or sustainable materials for your custom jeans buttons. Some manufacturers offer buttons made from recycled metals or bio-based materials that can align with your environmental values.
  5. Testing and Compliance: Ensure that the custom jeans buttons meet applicable safety and regulatory standards. Buttons should undergo testing to ensure they are free from harmful substances and comply with relevant regulations, such as those related to lead content or nickel release.
  6. Care Instructions: Ask the supplier for care instructions for the buttons. While jeans buttons are generally durable, it’s essential to follow proper care practices to ensure their longevity. This can include recommendations for washing, drying, and general maintenance to prevent damage or premature wear.
  7. Samples and Prototypes: If possible, request samples or prototypes of the custom jeans buttons before placing a full order. This allows you to assess the quality, appearance, and functionality of the buttons, ensuring they meet your expectations before committing to a larger quantity.
  8. Customer Support and After-Sales Service: Consider the level of customer support and after-sales service offered by the supplier. A responsive and helpful supplier can assist with any questions or concerns you may have throughout the ordering process and address any issues that may arise.

Remember to communicate your specific requirements and preferences clearly with the manufacturer or supplier of the custom jeans buttons. This will help ensure that you receive buttons that align with your design vision, quality expectations, and sustainability goals.

custom jeans buttons

How often should an excavator track roller be inspected and maintained?

The frequency of inspection and maintenance for excavator track rollers can vary depending on several factors, including the operating conditions, the intensity of use, and the manufacturer’s recommendations. However, as a general guideline, it is recommended to inspect and maintain excavator track rollers on a regular basis, which can be determined by the number of operating hours or the duration of usage.

Here are some general recommendations:

Regular Visual Inspections: Conduct visual inspections of the track rollers at the end of each workday or shift. Look for signs of wear, damage, misalignment, or loose components. Pay attention to any unusual noises or vibrations during operation, as these can also indicate potential issues with the track rollers.

Lubrication: Follow the manufacturer’s guidelines for lubrication intervals and procedures. Proper lubrication helps minimize friction, reduce wear, and extend the lifespan of the track rollers. Ensure that the lubricant used is compatible with the excavator’s specifications.

Cleaning: Keep the track rollers clean by removing dirt, debris, and mud regularly. Accumulated debris can accelerate wear and affect the performance of the track rollers. Use appropriate cleaning methods, such as using compressed air, water, or brushes, while taking care to prevent the entry of water or contaminants into sealed areas.

Periodic Maintenance: Perform more comprehensive maintenance tasks at recommended intervals, which can vary depending on the manufacturer’s guidelines or specific excavator model. This may involve disassembling and inspecting the track rollers, replacing worn components, and ensuring proper alignment.

Track Adjustment: As part of regular maintenance, adjust the track tension as needed. Improper track tension can cause excessive wear on the track rollers and other undercarriage components. Follow the manufacturer’s recommendations for proper track tensioning.

Component Replacement: Replace track rollers or worn components when they no longer meet the manufacturer’s tolerances or exhibit significant signs of wear, damage, or deterioration. Prompt replacement helps maintain the stability, traction, and overall performance of the excavator.

It’s important to note that these recommendations are general guidelines, and specific maintenance intervals and procedures can vary. Always refer to the manufacturer’s guidelines and consult the excavator’s service manual for accurate and detailed maintenance instructions specific to your excavator model. Additionally, factors such as extreme operating conditions or heavy usage may require more frequent inspections and maintenance.

What are the main components of an excavator track roller?

The main components of an excavator track roller typically include:

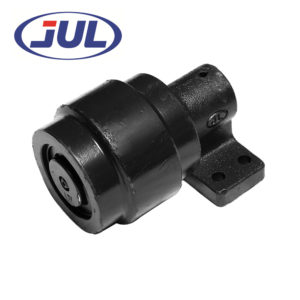
Roller Body: The roller body is the main structure of the track roller. It is usually a cylindrical or drum-shaped component that supports the weight of the excavator and the tension of the track chain. The roller body is designed to rotate smoothly on a shaft or bushing.

Shaft or Axle: The shaft or axle is a central component that runs through the roller body and provides a rotating axis. It is typically made of high-strength steel and is responsible for transmitting the load and torque from the track chain to the roller body.

Bearings: Bearings are used to support the shaft or axle within the roller body and facilitate its smooth rotation. These bearings can be ball bearings, needle bearings, or bushings, depending on the design and manufacturer’s specifications.

Seals: Seals are used to prevent the entry of contaminants, such as dirt, water, and debris, into the roller body and bearings. They help maintain the lubrication and protect the internal components from premature wear and damage.

Lubrication Fittings: Lubrication fittings, also known as grease fittings or zerk fittings, are commonly found on excavator track rollers. carrier roller excavator manufacturer  These fittings allow for the injection of grease or lubricant into the roller body to reduce friction and wear between the components.

Retaining Rings: Retaining rings or circlips are used to secure the bearings on the shaft or axle. They prevent the bearings from moving axially and ensure proper alignment and functioning of the roller assembly.

Mounting Hardware: Mounting hardware, such as bolts, nuts, and washers, is used to attach the track roller to the undercarriage frame or other components of the excavator. These components ensure secure and stable attachment of the track roller.

Wear Pads or Flanges: Some track rollers may have wear pads or flanges attached to the roller body. These pads or flanges help guide and support the track chain, reducing lateral movement and wear.

These are the main components of an excavator track roller, and their specific design and configuration may vary depending on the excavator model and manufacturer. Regular inspection, lubrication, and maintenance of these components are essential to ensure optimal performance, longevity, and reliability of the excavator’s undercarriage system.

What are the safety considerations when working with hydraulic cylinders in excavators?

When working with hydraulic cylinders in excavators, it’s important to prioritize safety to prevent accidents and ensure the well-being of operators and those in the vicinity.

Here are some key safety considerations:

  1. Training and Knowledge: Operators should receive proper training on the safe operation of excavators and hydraulic systems. They should be familiar with the functions and controls of hydraulic cylinders and understand the associated hazards and safety procedures.
  2. Lockout/Tagout: Before performing any maintenance or repair work on the hydraulic system or cylinders, it’s crucial to follow lockout/tagout procedures. This involves shutting off the power source, isolating the energy, and clearly indicating that the system is undergoing maintenance to prevent accidental activation.
  3. Personal Protective Equipment (PPE): Workers should wear appropriate PPE, such as safety glasses, gloves, hard hats, and steel-toed boots, when working with hydraulic cylinders. PPE helps protect against potential hazards like hydraulic fluid leaks, flying debris, or accidental contact with moving parts.
  4. Hydraulic Pressure Release: Before conducting any maintenance or repair work on a hydraulic cylinder, ensure that the hydraulic pressure is released. This can be done by activating the control valves to relieve pressure or by following the manufacturer’s recommended procedures.
  5. Avoid Overloading: Do not exceed the recommended lifting or load capacity of the hydraulic cylinders. Overloading can lead to cylinder failure, loss of control, or equipment tipping, posing serious safety risks.
  6. Inspection and Maintenance: Regularly inspect hydraulic cylinders for signs of wear, damage, or leaks. Address any issues promptly and perform maintenance tasks as recommended by the manufacturer. Avoid operating the excavator if there are visible problems with the hydraulic cylinders.
  7. Proper Lifting and Blocking: When performing maintenance or repair work on hydraulic cylinders, use appropriate lifting equipment and ensure the excavator is securely blocked to prevent accidental movement or collapse.
  8. Proper Storage of Spare Parts: If storing spare hydraulic cylinders or components, ensure they are stored securely and safely to prevent accidents or damage. Follow manufacturer recommendations for storage conditions.
  9. Risk Assessment: Conduct a risk assessment before starting any excavator operation involving hydraulic cylinders. Identify potential hazards and implement appropriate control measures to mitigate risks.
  10. Emergency Procedures: Ensure all operators are familiar with emergency procedures in case of hydraulic system failures, hydraulic fluid leaks, or other emergencies. This includes knowing how to shut off the machine, evacuate the area, and contact appropriate personnel for assistance.

Remember, these are general safety considerations, and it is essential to follow the specific safety guidelines provided by the excavator manufacturer and comply with local regulations and industry standards.

What are the main components of a hydraulic cylinder in an excavator?

The main components of a hydraulic cylinder in an excavator typically include:

  1. Cylinder Barrel: The cylinder barrel is a cylindrical tube that forms the main body of the hydraulic cylinder. It provides the housing for the other components and contains the pressurized hydraulic fluid.
  2. Piston: The piston is a cylindrical component that moves back and forth within the cylinder barrel. It is sealed against the cylinder barrel using piston seals and separates the cylinder into two chambers: the rod side and the cap side.
  3. Piston Rod: The piston rod is a hardened and polished rod that extends from the piston and protrudes out of the cylinder barrel. It transmits the force generated by the hydraulic fluid to the external load or attachment.
  4. Rod Gland: The rod gland, also known as the rod end or head, is located at the end of the cylinder barrel where the piston rod exits. It houses seals that prevent hydraulic fluid from leaking between the cylinder barrel and the piston rod.
  5. Rod Seals: Rod seals are located on the piston rod and provide a dynamic seal between the rod and the cylinder barrel. They prevent leakage of hydraulic fluid from the rod side to the cap side of the cylinder.
  6. Cap End: The cap end, also called the base or bottom end, is the closed end of the cylinder barrel opposite to the rod end. It provides a mounting surface for attaching the cylinder to the excavator’s frame or other components.
  7. Port Connections: Hydraulic cylinders have ports for connecting hydraulic hoses or pipes that supply and return hydraulic fluid to and from the cylinder. China bucket cylinder suppliers  These ports allow the controlled flow of hydraulic fluid into the cylinder to extend or retract the piston.
  8. Cushioning Devices: Some hydraulic cylinders incorporate cushioning devices, such as adjustable cushions or shock absorbers, to dampen the impact and decelerate the piston’s movement as it reaches the end of its stroke. This helps prevent damage to the cylinder and provides smoother operation.
  9. Mounting Hardware: Hydraulic cylinders are typically attached to the excavator’s frame or other components using mounting hardware, such as bolts or pins. The mounting hardware ensures secure and stable attachment of the cylinder.
  10. Seals and O-rings: Various seals and O-rings are used throughout the hydraulic cylinder to prevent leakage of hydraulic fluid and maintain the integrity of the system. These seals include piston seals, rod seals, and various other static and dynamic seals.

These components work together to convert hydraulic pressure into linear mechanical force, allowing the excavator to perform various tasks like lifting, digging, and pushing with precision and power.

The Importance of Using a Turn Ratio Tester in Application Testing

Using a turn ratio tester in application testing is crucial for various reasons. Here are some key points highlighting the importance of using a turn ratio tester:

Transformer Performance Assessment:

A turn ratio tester is primarily used to evaluate the performance of transformers. By measuring the turns ratio of a transformer, it provides valuable information about the transformer’s condition, including its winding configuration, overall health, and potential issues.

Quality Assurance during Manufacturing:

Turn ratio testing is an essential part of transformer manufacturing processes. It helps ensure that the transformers being produced meet the specified turns ratio requirements. By identifying any deviations or errors in the winding turns, manufacturers can take corrective actions to maintain product quality and consistency.

Detection of Winding Faults:

A turn ratio tester can detect various winding faults in transformers, such as shorted turns, open turns, or inter-turn faults. These faults can negatively impact the transformer’s performance, efficiency, and reliability. By detecting such faults early on, maintenance personnel can undertake necessary repairs or replacements, preventing further damage or failures.

Verification of Transformer Connections:


Turn ratio testing allows for the verification of correct transformer connections. It ensures that the primary and secondary windings are properly connected and that the turns ratio matches the design specifications. Incorrect connections can lead to inefficient power transfer, voltage regulation issues, or even safety hazards.

Identification of Tap Changer Issues:

Tap changers are mechanisms used in transformers to adjust the turns ratio and voltage output. Turn ratio testing can help identify potential issues with tap changers, such as misalignment, mechanical faults, or poor contact. Timely detection of tap changer problems allows for necessary maintenance or repairs to ensure proper voltage regulation and performance.

Preventive Maintenance:

Regular turn ratio testing forms a part of preventive maintenance programs for transformers. By periodically testing the turns ratio, maintenance personnel can monitor the transformer’s condition, track any changes over time, and identify potential problems before they escalate. This proactive approach helps in preventing unexpected failures, optimizing the transformer’s lifespan, and reducing downtime.

Compliance with Standards and Regulations:

Turn ratio testing is often required to comply with industry standards and regulations. Standards such as IEEE C57.12.90 and IEC 60076 provide guidelines for transformer testing, including turn ratio measurements. Adhering to these standards ensures that transformers meet the specified performance and safety requirements.

Data-Driven Decision Making:

Turn ratio testers provide precise measurements and generate detailed reports with turn ratio values. These reports help maintenance personnel make informed decisions regarding transformer maintenance, repairs, or replacements based on accurate and reliable data.

Unlock the Potential of Your Projects with 18 gauge stainless steel nails: A Complete Guide

Here is a complete guide to unlocking the potential of your projects with 18 gauge stainless steel nails:

Material Choice

Stainless resists corrosion, maintaining integrity longer than coated steel in wet environments.

Nail Length

Measure materials’ combined thickness to select the proper nail penetration depth for strength.

Point Style

Sharp, narrow points smoothly penetrate without splitting materials like other blunt nail tip styles.

Shank Design

Spiral shanks tightly thread into place during nailing for maximum holding power and minimal pullout.

18 gauge stainless steel nails

Head Style

Round heads, when set properly below the surface, provide a seamless appearance without compromising load bearing ability.

Surface Finishing

Brushed or satin finish resists fingerprints and smudges while still offering good gripping texture during installation.

Fastening Tools

For securing in tight spaces or many fasteners, consider an air nailer/stapler for speed and precision placement.

Material Compatibility

Stainless won’t react chemically with treated wood, composites or moisture-prone applications like outdoors.

Project Applications

Ideal for decking, siding, trim, furniture, marine, outdoor signs and more wherever long term corrosion resistance is required.

Choosing the right 18ga stainless nails sets your project up for long lasting, damage free results.

What are some common applications where ceramic fiber cloth is used?

Here are some common applications where ceramic fiber cloth insulation is used:

Furnace and kiln lining

Provides insulation and protection from extreme heat inside industrial furnaces and kilns.

Boiler and pipe insulation

Wraps high-temperature steam pipes, pressure vessels, boilers and other equipment.

Oven and dryer insulation

Lining for curing ovens, paint booths, food dryers to shield surfaces from heat.

Welding curtains

Blocks radiant heat and prevents spark damages during gas welding and metal cutting.

ceramic fiber cloth

Backup structural insulation

Installed behind firebrick or other refractory in high-heat areas like incinerators.

Vehicle exhaust system

Shields under-hood exhaust manifolds, turbochargers and converters from engine heat.

Glass working equipment

Insulation for furnaces, ladles and burners involved in glass melting and forming.

Forges and die casting

Wraps forging hammers, presses and molds handling molten metals up to 3000°F.

Laboratory hood and door seals

Seals and gaskets to insulate walk-in ovens, kilns and process chambers.

Ceramic cloth is well-suited for any application requiring insulation from extreme temperatures, sparks or thermal radiation.